A majority of our customers utilize 24VAC solenoids, which actuate open when 24VAC is supplied to them, and actuate shut when that voltage drops to 0VAC. Below are some examples of common failure points and how one can troubleshoot, isolate, and resolve those issues:
Valve being commanded on from the controller but smaller irrigation event occurs
Below is a snippet of common troubleshooting scenario, where the valve is being commanded to open per the rules setup on the controller, but the VWC increase seen by the probe is less than normal: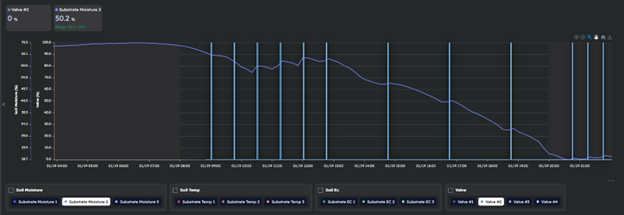
Here the horizontal line is the moisture content of the substrate, and each vertical line is the associated valve for that zone being commanded on and off.
With each activation, one sees a minor increase in VWC but not the usual increase one would expect as the VWC begins to decrease markedly halfway through the site’s irrigation cycle. The most likely causes of this behavior is a lack of supply water from the upstream reservoir or batch tank, an impediment of flow downstream to the zone, or the solenoid not actuating fully despite receiving 24VAC from the controller.
One can test for the former two issues by manually opening the valve and confirming the flow rate at the emitters in the zone, and the latter can be tested by confirming the voltage at the output of the controller using a multi-meter.
If the flow rate is the same, the reservoir is full, and the solenoid is receiving 24VAC and actuating appropriately, then the issue may be that the plants are increasing in their rate of transpiration and their subsequent uptake in water within the substrate. Increasing the shot duration of your irrigation events can help isolate this piece further.
Valve does not actuate when turned on from the Controller Dashboard
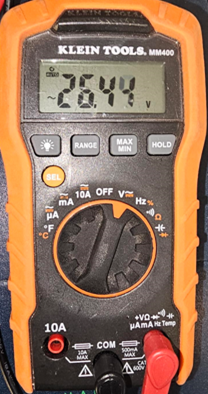
Another common scenario is that the solenoid wired to an output does not actuate when the output is turned on from our software dashboard. One can confirm that the output is functional by taking a voltage reading with a multi-meter at the output itself. One can test the voltage by setting your multimeter to read AC voltage (V~), placing your red probe on the positive (+) for the output and the black probe on the negative (-) for the same output, though for low voltage one could use either probe in either orientation.
When one turns on the output, one should see ~24VAC. If one does not see any voltage when the output is turned on, either an upstream fuse has been tripped or there is a short in the field wiring downstream. One can isolate if the issue is with a tripped fuse or a short in the field wiring by disconnecting the field wiring, tightening down the screws for the output, resetting the controller, then taking another voltage reading with the output turned back on:

If 24VAC is seen on the output at this point in troubleshooting, the issue is with the field wiring downstream of the controller. One would want to ensure that the solenoids being used can be controlled via 24VAC control voltage and that there are no splices that have exposed copper that could cause the connection to short out. One could also take a reading at the solenoid itself to confirm that the voltage is reaching the solenoid to rule out a faulty solenoid as well.
If 0VAC is seen after these troubleshooting steps, then it is likely that an upstream fuse has been tripped due to a short and will not reset. Reach out to our Support Team at Support@growlink.com, and a warranty claim can be initiated depending on the age of the controller relative to our warranty terms and conditions.
Warranty Info:
Controller hardware sold has a warranty of 3 years from the date of receipt or date of registration, whichever occurs first. Further warranty information can be found at the link below:
https://www.growlink.ag/return-policy-1