Technical Specifications
| Power Input: | 24VAC |
| Environmental Sensor Input(s): |
SDI-12 Compact Weather Sensor, SDI-12 Quantum PAR Sensor (optional) |
| 12 VDC Power | |
| 3.3v Signal | |
| Output: | 24 VAC |
| 1 Amp Fuse Per Output | |
| Wi-Fi & Local RF: |
2.4 GHz |
Features
Remote Access - Monitor your outdoor climate remotely and quickly adjust strategies from a smartphone, tablet, or laptop - anytime, anywhere.
Automate Equipment Responses to Outdoor Weather – The Weather Station can be paired with Growlink Custom UL Panels. This allows control of vents, fans, heaters and other equipment to be altered in response to changes in weather.
OTA Updates - Our controllers regularly receive over-the-air software updates that add new features and enhance existing ones over Wi-Fi.
Alerts - Stay informed on all active and historical alerts from your Growlink systems.
Fanatical Support - Free support from a Growlink specialist (during office hours).
What’s In The Box
x1 24 VAC Power Supply
x1 Mounting Hardware Kit
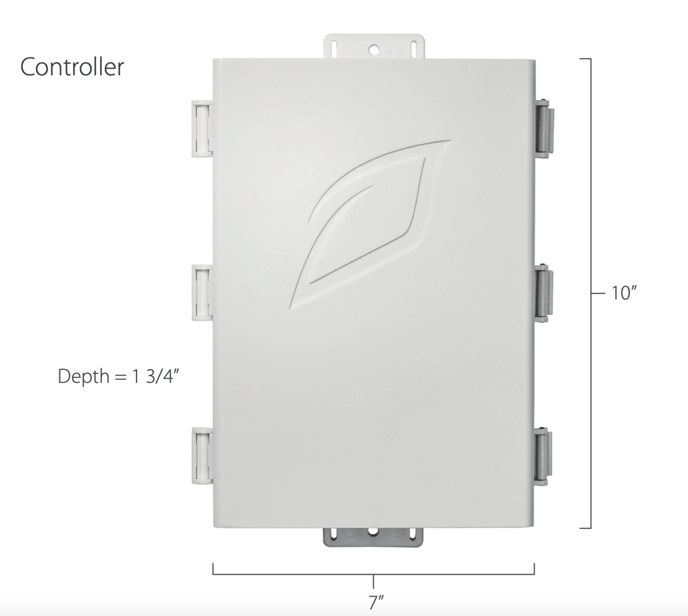
Controller and Sensor Dimensions
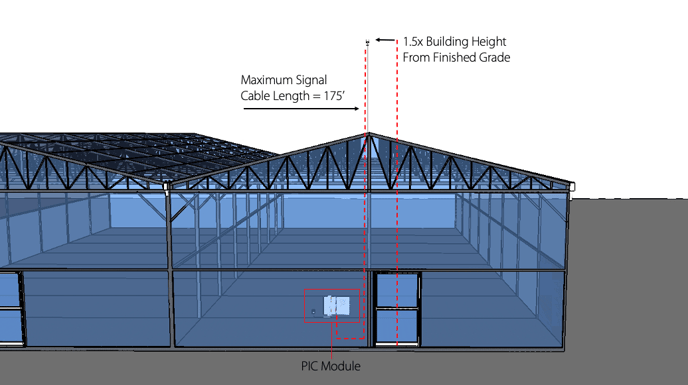
Installation
Refer to the ClimaVUE 50 Product Manual for detailed installation instructions of the weather sensor. The manual may be found here.
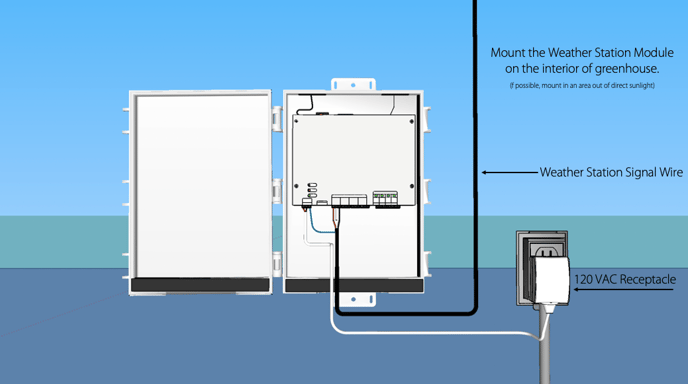
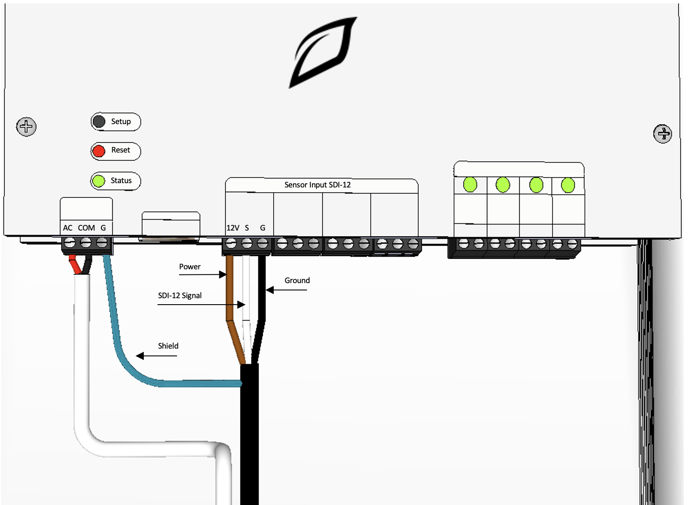
Module Wiring
Quick Setup Guide
Wifi Setup Guide
Ethernet Setup Guide
1. Download the Growlink app from the Apple App Store, or Google Play Store.

2. Open the Growlink app and tap Create Account.
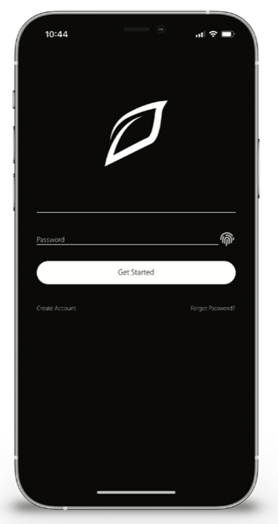
3. After creating an account, log into the app.
4. Tap on the settings icon in the top right corner and then tap Add Hardware.
5. Select the option of 'Growlink Equipment' in the following menu, followed by the 'Continue to Setup' button.
6. Select the option of 'Add New Growlink Controller to my account' option.
If it is your first time creating an account, you will be automatically prompted to Setup A New Device.
7. - Plug in your Growlink device to power it on.
- The LED should be blinking blue. If not, hold the SETUP button for 3 seconds
- Make sure your mobile device is connected to the internet.
NOTE: The first time using the Growlink app you will be prompted to allow Bluetooth access. This is required to setup all Growlink controllers.

8. For iPhone users: Tap New Bluetooth Device, then tap on the controller you wish to connect to. A successful connection will be indicated with a "Congrats" message.
- If using a Legacy model controller (Non-Bluetooth), tap "Legacy Wi-Fi Device"
- From the "Waiting for Wi-Fi connection" screen, follow the instructions shown on your device to complete the Wi-Fi connection process
For Android users: The Growlink app will detect if your controller is a Bluetooth device or a Legacy model device. Simply tap on the controller you wish to connect to once it shows on the screen.
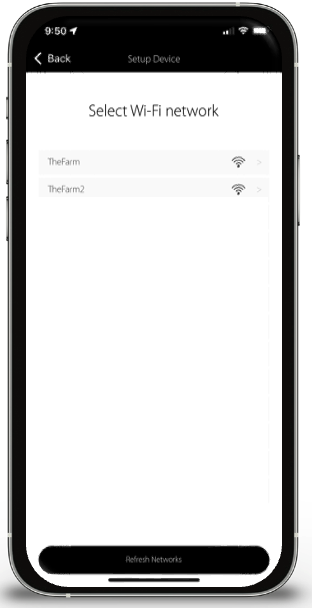
9. After the Bluetooth connection process is complete, a list of available Wi-Fi networks will appear. Tap on the network you wish To connect to, enter the network password, then tap Next.
10. Name your controller (i.e. Flower Room Irrigation).
11. After controller registration, tap on Go To Settings.
From the Controller Profile page, you can set where you are located, time zone, Day Start & Day End (Lights On and Lights Off). After making changes, tap Save and you will be returned to the Main Dashboard.
Troubleshooting
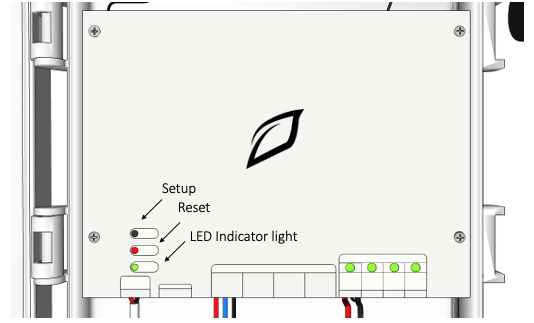
Controller didn't connect to Wi-Fi: If you are unsuccessful in the first attempt to connect your controller to a Wi-Fi network, hold down the Setup button located on the front of the controller for approximately 12-15 seconds until you see a rapid flashing blue light. Once you see the rapid flash, immediately release the Setup button. This will put the controller into Listening Mode (Blinking Blue), and you will then restart the connection process outlined in step 4 of this guide.
The Wi-Fi network being used has changed: In the event you need to re-connect the controller to an existing Wi-Fi network, put the controller back into Listening Mode (see above) and follow the Controller Connection process outlined in step 4.
Controller LED Status Light Color Codes
During device setup and operation, these are the LED light indicators:
- Solid White: Firmware Startup
- Slow Flashing Green: Wi-Fi connecting
- Fast Flashing Green: Wi-Fi waiting on IP address
- Fast Flashing Cyan: Wi-Fi connected, connecting to cloud
- Fast Breathing Green: Loading configuration and detecting probes
- Slow Breathing Green: Connected to cloud and running
- Slow Flashing Blue: Wi-Fi configuration mode
- Safe Mode: Slow breathing magenta
- Safe Mode Requested: Fast flashing magenta
- Firmware Updating: Slow flashing magenta
- Slow Flashing Blue: Wi-Fi setup mode