Batch Tank Monitor Technical Specifications
| Power Input: | 12-24VDC - 1A |
| Sensor Input(s): | 1x 4-20mA Receiver With Integrated 24VDC power |
| 1x PT1000 Temperature Probe Port | |
| 1x Flow Meter Port (Pulse) | |
| 1x pH Probe Port | |
| 1x EC Probe Port | |
| Wi-Fi & Local RF: | 2.4 GHz |
Features
- Remote Access - Manage and monitor your batch tanks remotely and quickly adjust strategies from a smartphone, tablet, or laptop - anytime, anywhere.
- Sensorex pH & EC Sensors - Accurately measure and record pH and TDS readings throughout the growth cycle.
- OTA Updates - Our controllers regularly receive over-the-air software updates that add new features and enhance existing ones over Wi-Fi.
- Alerts - Stay informed on all active and historical alerts from your Growlink systems. Fanatical Support - Free support from a Growlink specialist (during office hours).
What’s Included
x1 Batch Tank Monitor
x1 pH Sensor
x1 EC Sensor
x1 Power Supply
x1 Mounting Hardware Kit
x1 Calibration Solution Kit (TDS 1413uS, pH 4.01, pH 7.00)*
*Contents may vary depending on order placed
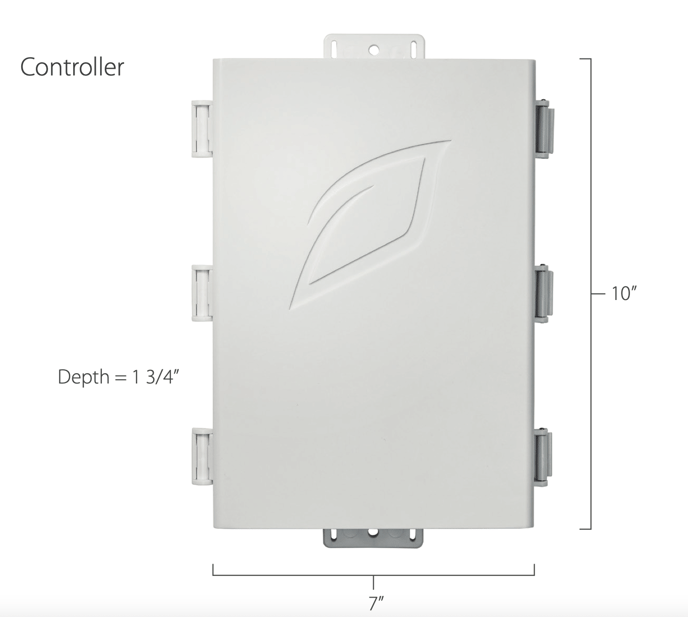
Controller and Sensor Dimensions
Installation & Wiring Instructions
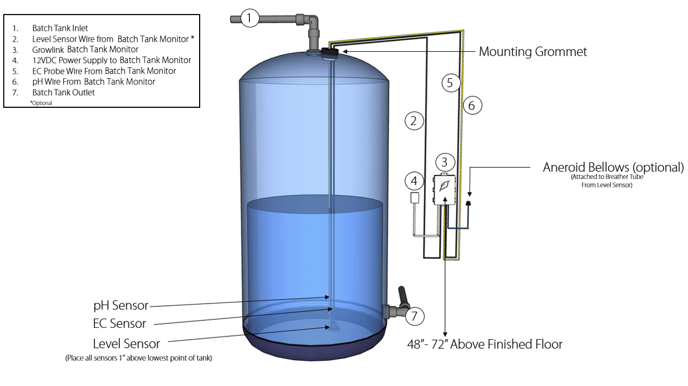
If installing Batch Tank Monitors in a commercial facility with a Growlink Nutrient Delivery System, do not terminate level sensor cable on BTM 4-20mA Input. All level sensors need to terminate at the system control panel. Refer to panel drawings for exact terminations.
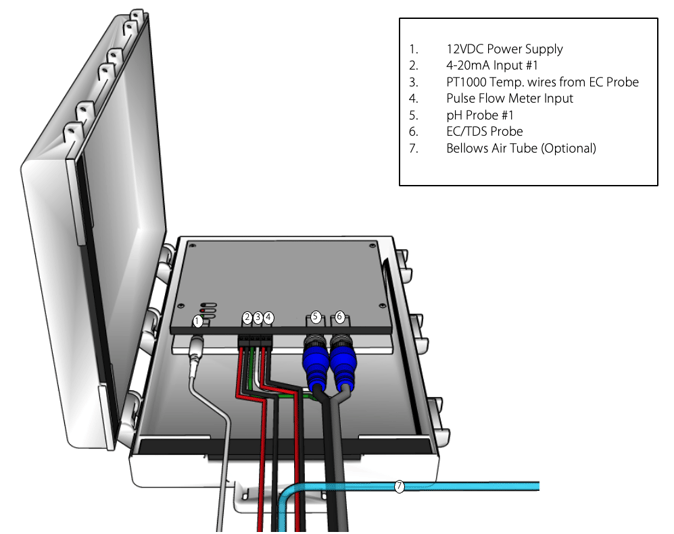
*Note: The PT1000 temp sensor's wires can be connected to the Temp input terminal block in any order, as polarity does not matter.
Mobile App Setup Guide
1) Login to the Mobile App using your username and password. If you have not created a username yet, click the ‘Sign Up’ button at the login page to create a username for your account:
2) Once logged in, tap the icon of the lines in the top-left corner, followed by tapping the ‘Hardware’ button:
3) Tap the ‘+Add” button at the top right of the following page:
4) Select the Room you wish to add the new controller to, or tap the “Create New Room” button to create a new room for the new hardware to be added:
5) Provide a name for the Room, the Square Footage of the Room, and the Room Type, followed by tapping the 'Create’ Button to finish creating that room:
6) Select the ‘Other Growlink Equipment’ option in the subsequent menu:
7) In the following menu, select ‘Set up a new device in this room’:
8) Next, tap the ‘Get Started’ button underneath the ‘Set up a Wi-Fi Device’ section:
9) The following screen will then attempt to pair your phone with the Wi-Fi capable device. Select the appropriate pairing method for your device. Devices that pair via Bluetooth will have a Bluetooth symbol on their enclosure and older Legacy Devices without that symbol pair via a temporary WiFi SSID:
10) Once the controller is paired to your phone, you will then select the WiFi network you wish to connect the controller to, followed by inputting the password for that network:
11) Once WiFi credentials have been provided, all that is left is to name the controller and tap the ‘Next’ button on the following screen. The Mobile app will then attempt to register the controller to your account and pass those credentials towards the controller.
12) Once successfully connected, the following success message will display. Tap the ‘Add Equipment to this Controller’ to add more hardware to this controller, Tap the ‘Edit Controller Profile’ button to update the Controller Profile Settings, or tap the ‘Go to Room Dashboard’ button to view the dashboard for the newly connected controller:
pH & EC/TDS Calibration Process
Note: The Batch Tank Module uses the same calibration process as the Growlink SW-2. View the video below to see the process. Mention of the pH #2 input only applies to the SW-2.
Troubleshooting
Controller didn’t connect to Wi-Fi:
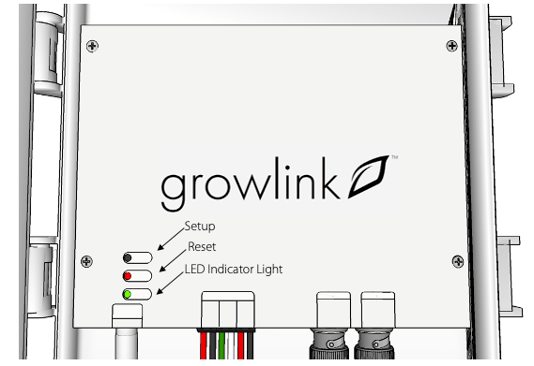
If unsuccessful in the first attempt to connect the controller to the Wi-Fi network, hold down the Setup button located on the controller (see image below) for approximately 12-15 seconds until there is a rapid flashing blue light. Once rapid flashing becomes visible, immediately release the Setup button. This will put the controller into Listening Mode (Blinking Blue). Now, restart the connection process outlined in the Quick Setup Guide section above.
The Wi-Fi network being used has changed:
In the event the controller needs to re-connect to an existing or new Wi-Fi network, put the controller back into Listening Mode (see above) and follow the Controller Connection process outlined in the Quick Setup Guide section above.
pH values are not as expected or do not match with 3rd party measuring device:
Recalibrate pH and EC Probes (see video above). To ensure accuracy, recalibrate 3rd party measuring device using the same buffer solutions used to calibrate the Smart Water Wireless 2/ Batch Tank Module probes.
Controller LED Status Light Color Codes
During device setup and operation, these are the LED light indicators:
- Solid White: Firmware Startup
- Slow Flashing Green: Wi-Fi connecting
- Fast Flashing Green: Wi-Fi waiting on IP address
- Fast Flashing Cyan: Wi-Fi connected, connecting to cloud
- Fast Breathing Green: Loading configuration and detecting probes
- Slow Breathing Green: Connected to cloud and running
- Slow Flashing Blue: Wi-Fi configuration mode
- Safe Mode: Slow breathing magenta
- Safe Mode Requested: Fast flashing magenta
- Firmware Updating: Slow flashing magenta
- Slow Flashing Blue: Wi-Fi setup mode