This article discusses how to address the ESM-3 Environmental Sensors using the Connect Controller's SDI-12 Setup Mode.
How to Address the ESM-3 using the Connect SDI-12 Setup Mode
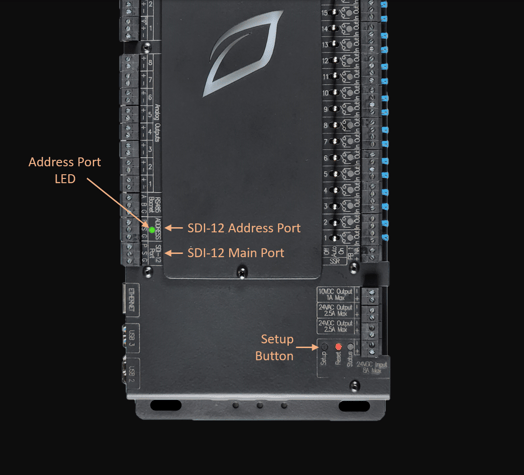
- Press and hold the setup button for 6 seconds, until the Address Port LED rapidly flashes amber/yellow. Release the setup button.
- The Address Port LED will flash rapidly while waiting for the SDI-12 Main Port to refresh and detect all connected devices (if any) to the SDI-12 Main Port.
- When device refresh is complete, the Address Port LED will turn solid green for three seconds and then start to flicker green (i.e., 100ms on, 900ms off). This indicates that the controller is in SDI-12 Setup Mode.
- Connect a single ESM-3 Sensor that needs to be addressed (or readdressed) to the SDI-12 Address Port (Brown Wire to "P" Terminal, White Wire to "S", Blue wire to "G". The Black wire is unused with the Connect Controller).
- Press the Setup Button for at least 100 milliseconds, but no more than two seconds while in setup mode. There are two possible outcomes:
- If the ESM-3 connected to the SDI-12 Address Port is successfully readdressed, the Address Port LED will turn solid yellow while it's performing the readdress and registering the sensor. Once complete, the Address Port LED will turn solid green for three seconds.
- If there is an error (no probe detected or there were no available addresses), the SDI-12 LED will turn red for three seconds.
- After either of the outcomes in the previous step, the Address Port LED will go back to the flickering green state (i.e., 100ms on, 900ms off), indicating that the controller is still in SDI-12 Setup Mode.
- Disconnect the successfully addressed ESM-3 that was connected to the SDI-12 Address Port.
- Repeat Steps 3 through 6 for each ESM-3 Sensor that needs to be addressed or readdressed.
- When all addressing is complete, press and hold the setup button for three seconds until the Address LED turns solid yellow, then release the setup button. The LED will stay solid yellow for a couple seconds, then turn off, indicating that the controller is no longer in SDI-12 setup mode.
- Attach all newly readdressed probes to the SDI-12 Main Port (See ESM-3 Wiring Diagram). Press and hold the Setup Button until the LED turns solid yellow, then release. The LED will rapidly flash yellow which indicates it's performing an SDI-12 Main Port refresh without entering the SDI-12 setup mode.