H.E. Anderson pumps have several variables that determine the volume they're able to inject. If you’re wondering what the acceptable injection range is for a recipe part, follow the 4 steps below.
Important Note
After changing injector dial positions, the injectors should be recalibrated using a calibration column tool. For information on calibrating H.E. Anderson injectors click here.
1. Determine H.E. Anderson Pump Model
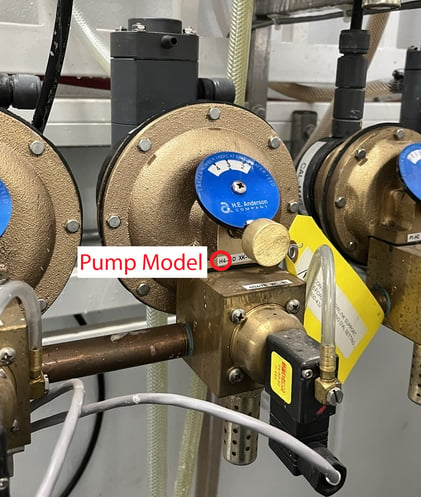
There are 4 models, ranging from smallest to largest, they are: A3, P1, P2 & H4. The pump model is printed on the front of the pump. The larger the pump, the larger the amount of solution the pump is capable of injecting. You may think, why not use the largest size pump for everything? Large pumps are not capable of injecting small amounts of liquid precisely. Using a large pump to inject pH Up, pH Down or Silica, for example, would likely result in over injection and produce inconsistent recipes. Pumps need to be sized according to the injection rates and flow rates of your setup to produce reliable results.
2. Determine H.E. Anderson Pump Dial Position
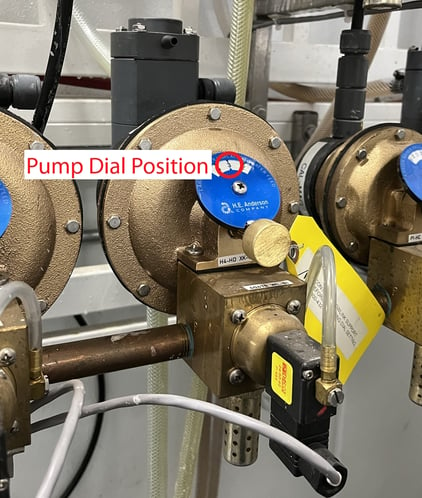
The blue dial with numbers 1 to 10 on the face indicates the position. The number underneath the indicator line on the dial is the current position. This knob and dial determine the percentage of injection capacity the pump is set to. If the dial is at 10 that means it’s set to inject 100% of its rated capacity. Pumps in the U.S. are typically rated in GPH (Gallons per Hour). This rating is a measurement of the volume of liquid which would be dispensed from the pump if it ran at full throttle continuously for 1 hour. For example, an H4 pump is rated at 25.4 GPH. At dial setting 10 (100%) it will inject 25.4 GPH but turn the dial to 5 (50%) and now the pump will inject 12.7 GPH or 50% of its max rating. The required dial positions are calculated based on your specific recipes and water flow rates. Dial positions should be kept at the settings specified. If changes need to be made, consult with Growlink tech support beforehand.
Dial settings below 3 on H4, P2 and P1 pumps are not recommended to be used if there is another solution available. These models aren’t as accurate when set to positions 1 and 2.
3. Determine Water Flow Rates (GPM) 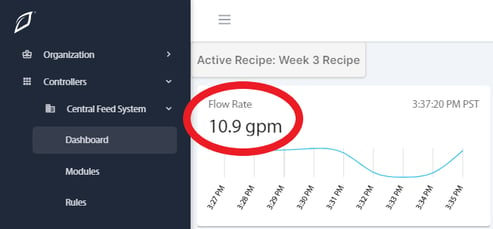 Watch the Flow Rate measured in GPM on your Growlink Dashboard as water flows to the desired zone. Flow rate greatly affects injection rates. As flow rate increases or decreases, the CFS must increase or decrease the pump injections per minute to match and continue achieving the desired ml/gal.
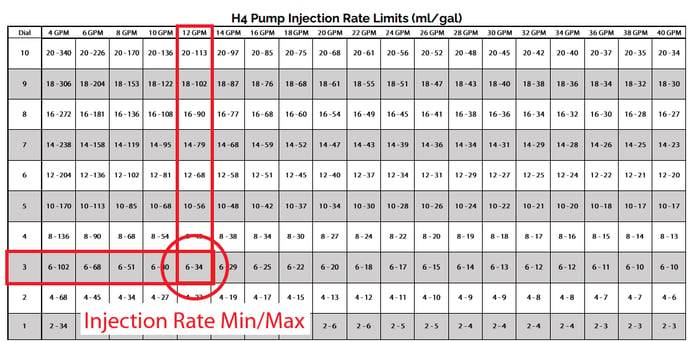
4. Find ml/gal Range for the Pump Model, Dial Position and Flow Rate Open the pump model table below which matches the pump model found in Step 1. Find the flow rate observed from the Growlink Dashboard and the pump dial position found on the pump. The intersection of these two variables will provide the ml/gal range the pump can inject.
For Example
Using the images above, the pump is an H4 so open the H4 Pump Injection Rate Limits table. The dial position is at 3 so look at the "3" dial position row. The Flow Rate is 10.9 GPM so err on the side of caution and look at the column for the next flow rate up on the table which is 12 GPM. This means this pump can safely inject between 6-34 ml/gal at this flow rate. In reality, the maximum would be 37.5 ml/gal since flow rate is closer to 11 GPM (between 10 and 12 GPM on this table). So halfway between between the max of 34 ml/gal at 12 GPM and 40 ml/gal at 10 GPM is 37.5 ml/gal.